Plasmic


Overview
By connecting Supabase with Plasmic, a visual builder for the web, you can build data-backed applications without code. While many users leverage Plasmic to quickly launch and iterate on landing pages, Plasmic can be used as a general-purpose visual builder for React, which can be used to design and implement fully featured read-write applications.
Documentation
In this guide, we will show you how to build a crowd-sourced Pokemon Pokedex, by connecting Supabase, an open source Firebase backend alternative, with Plasmic, a visual builder for the web. While many users leverage Plasmic to quickly launch and iterate on landing pages, in this tutorial we’ll show just how powerful Plasmic can be as a general-purpose visual builder for React, which can be used to design and implement fully featured read-write applications.
You can play with the live demo here: https://plasmic-supabase-demo.vercel.app/
You can also take a look at the Plasmic project here: https://studio.plasmic.app/projects/66RKaSPCwKxYjCfXWHCxn6
You’ll need to enable 3rd-party cookies in your browser for the project to properly load.
At a high level,
- Supabase is used to store the database of Pokemon (backed by Postgres) and provides an authentication backend. Our code base includes React components for querying the database, displaying this data, and supporting user sessions.
- Plasmic is used to create the pages and visual design of the application. We import our Supabase components into the Studio, which can be visually assembled and configured there (e.g. for displaying data).
- Plasmic designed pages are rendered back into the Next.js application.
Step 1: Set up your Backend on Supabase
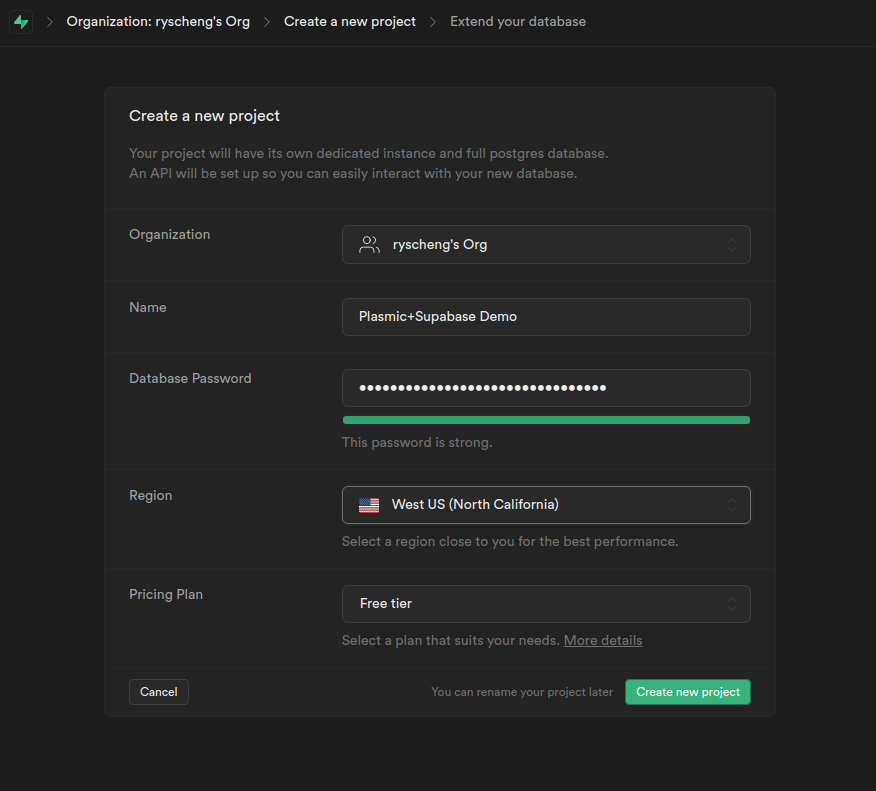
- On the Supabase dashboard, click
New projectand set the name of the project. By default, Supabase will already be set up for user signups with email, with users being stored in auserstable.
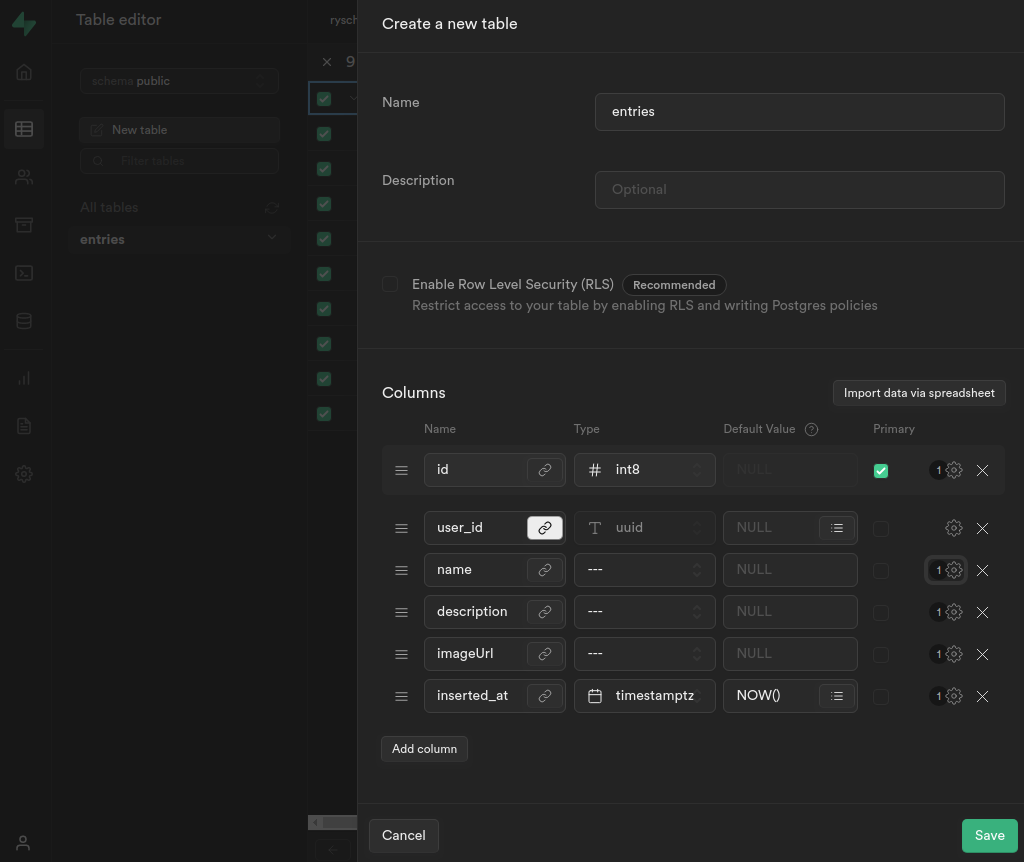
- Navigate to the
Table Editoron the left side navigation bar. Here we can create aNew tableto store our Pokemon entries. Make sure you are in theschema publicview. Create a new table calledentries, with 6 columns:id: is a unique ID for the entry. This column should be generated automatically as the primary column.user_id: Create a relation to theusertable by clicking on the link icon next to the column name. Here, you can select theidcolumn of theusertable.name,description,imageUrl: This will store the name, description, and imageUrl for each Pokemon.inserted_at: This will be an automatically populated column, set to when the row was first inserted.
Note: In this tutorial we’ve turned off “Row Level Security (RLS)”. In practice, you will want to create policies that restrict who gets to create, edit, and delete posts. By turning this off, any user can modify the database without restrictions.
For your convenience, feel free to import the following CSV into Supabase to pre-populate your database. In order to import, you must select Import data via spreadsheet, in the new table dialog box. (It does not work on existing tables.)
Step 2: Set up your codebase
We have a working code example for you here. This starter comes with all of the code components you need to get started querying Supabase through Plasmic Studio.
Code components are React components defined in your code base that we import into Plasmic Studio for use. Your project will be configured to look for these at
http://localhost:3000/plasmic-hostYou can use these components in your design, as well as style them. Check outsupabase-demo/plasmic-init.tsto see how they are registered with Plasmic.
First, clone the repo to your development machine and install the dependencies.
_10git clone git@github.com:plasmicapp/plasmic.git_10cd plasmic/examples/supabase-demo/_10yarn install
Copy .env.example to .env.local, which will store the environment variables when running a local development server. Add your Supabase project’s URL and public key, which you can find in the API tab on the left pane of your Supabase dashboard.
Now run the dev server, which listens at http://localhost:3000
_10yarn dev
Step 3: Explore the existing application
Navigate to http://localhost:3000 in your web browser. The project will already be set up for user signups, logins, and an admin interface for adding and editing Pokemon to the database. Feel free to sign up with your email address for an account and add Pokemon to the database. Supabase will require that you verify your email address before you can log in.
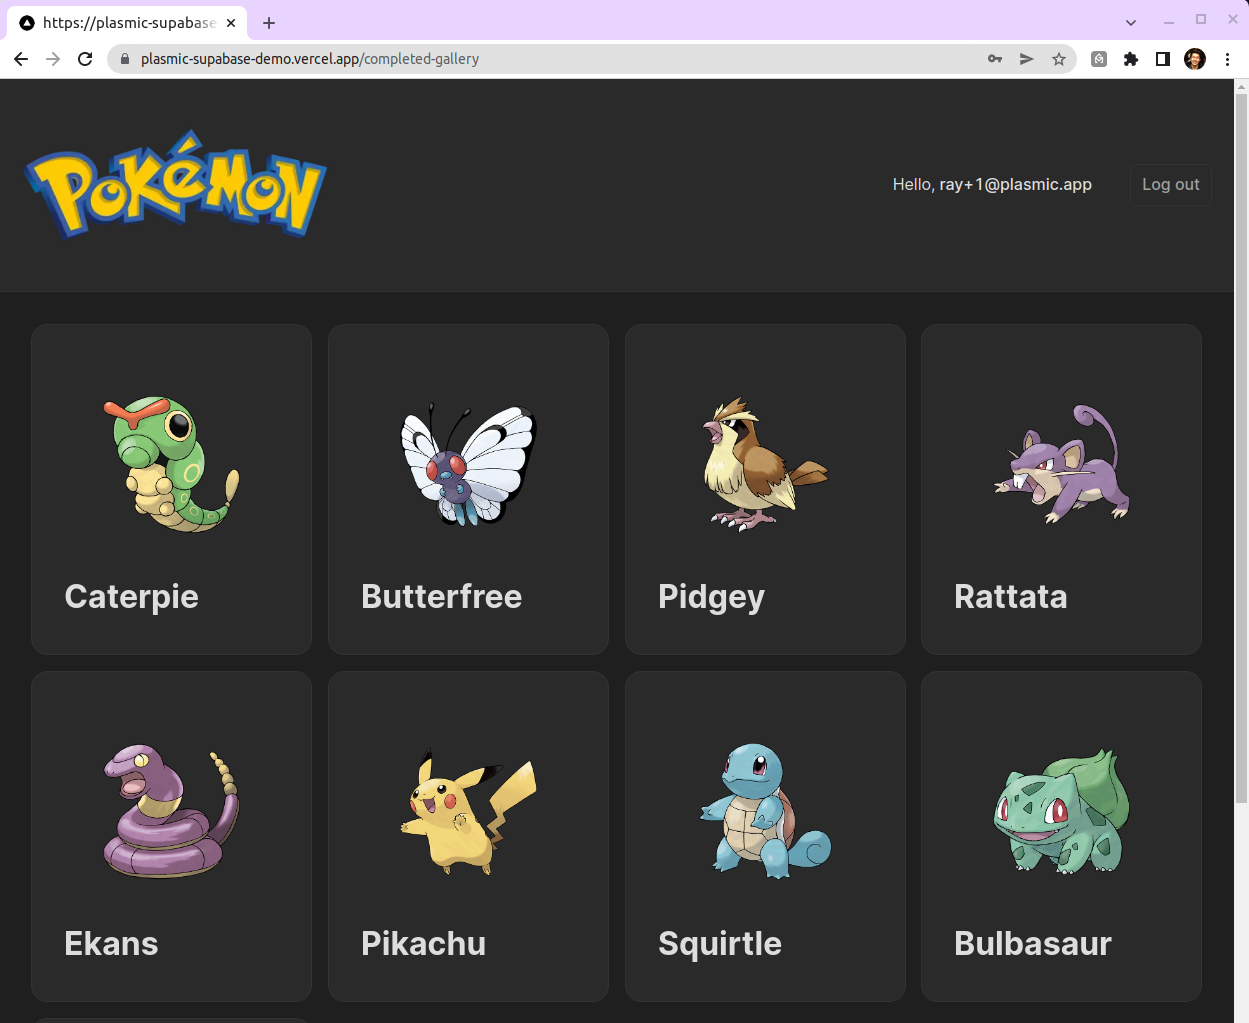
If you pre-populated the database in Step 1. you should see the following homepage after logging in. Otherwise, feel free to add Pokemon manually via the UI.

Step 4: Clone the Plasmic project
Now let’s try to make some additions! The code base is currently configured to a read-only copy of the Plasmic project. Let’s make an editable copy first.
Open the default starter Plasmic project here: https://studio.plasmic.app/projects/66RKaSPCwKxYjCfXWHCxn6
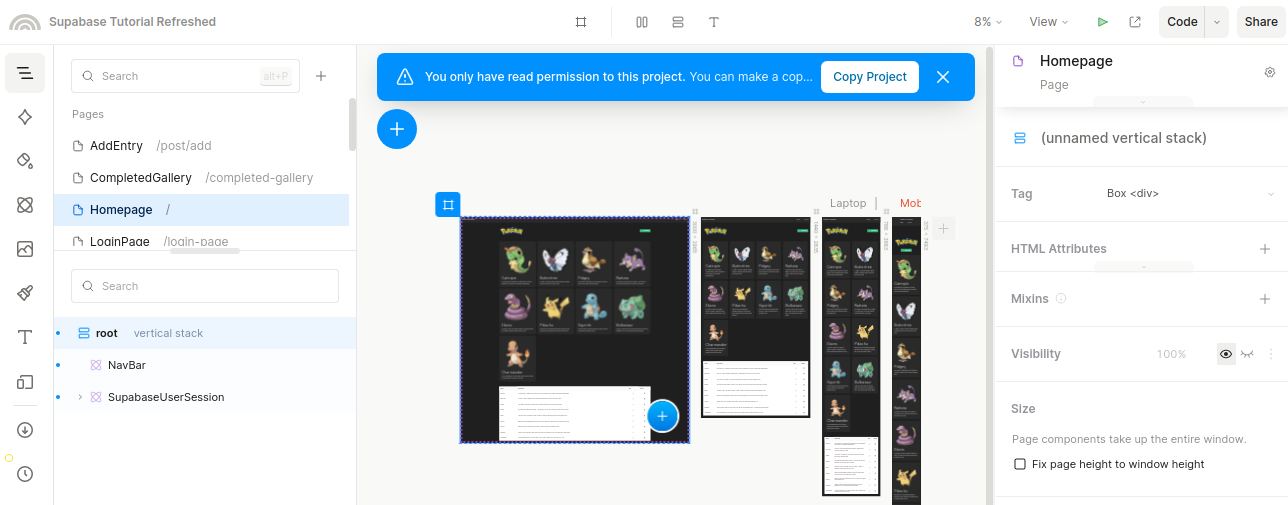
To make an editable copy, click on the Copy Project button in the blue bar. This will clone the project and redirect you to your copy.
Step 4a: Configure your code base to use the new Plasmic project
Take note of the project ID and API token. You can find the project ID in the URL:
https://studio.plasmic.app/projects/PROJECTID.
The API token can be found by clicking the Code button in the top bar.
Now go back to .env.local and update the corresponding project ID and token fields.
Step 4b: Configure your Plasmic project app host
To tell Plasmic to look for your code components on your dev server, you’ll need to update your project’s app host to http://localhost:3000/plasmic-host.
Note: At this point, you’ll need to keep your dev server running at
http://localhost:3000for the project to load.
After restarting the dev server and Plasmic Studio, you should now be able to make edits across Plasmic Studio and your codebase.
Step 5: Create a new page for our Pokedex gallery
Let’s make a visual gallery for our Pokemon by using the code components from the code base.
Create a new page called Gallery, and set a path for this page (/gallery).
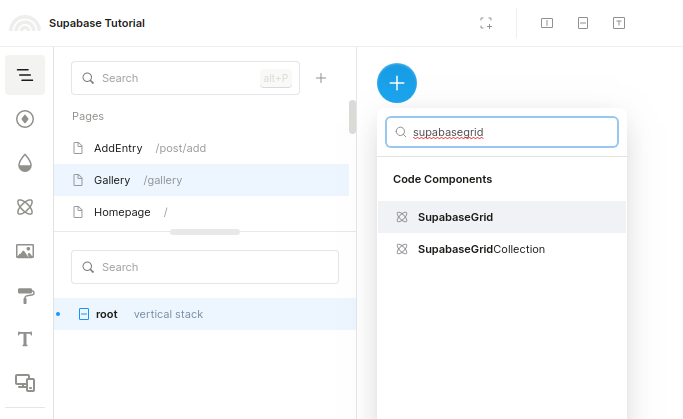
Insert a SupabaseGrid by searching the AddDrawer (by clicking the blue + button)
For source see
components/CodeComponents/DatabaseComponents.tsx
Then in the right-hand panel, configure the props on SupabaseGrid.
tableNameshould match the table you created in SupabasetableColumnsare a comma-delimited list of columns you want to select from the table- We also set the number of columns and spacing shown in the grid
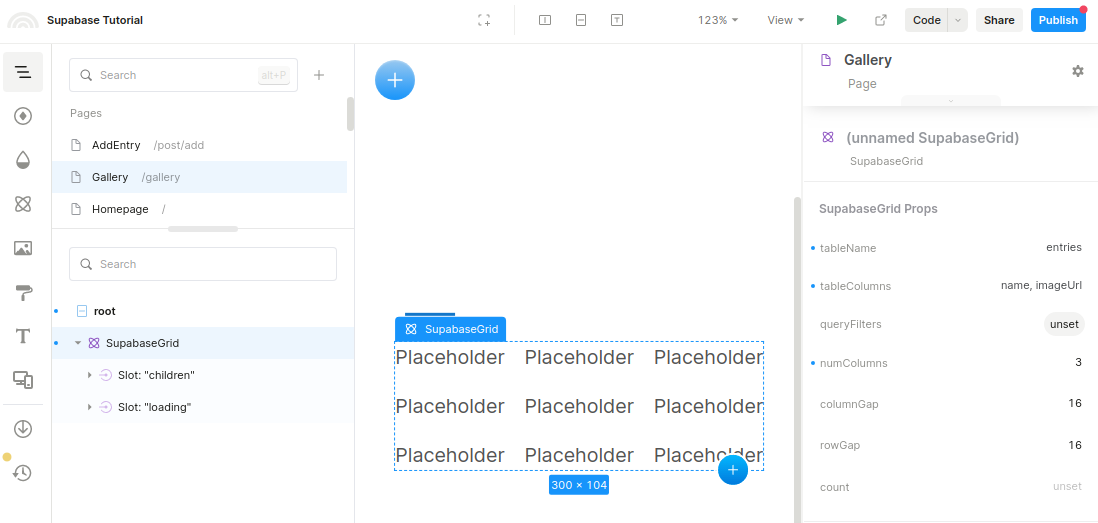
The SupabaseGrid will loop over the rows from the query.
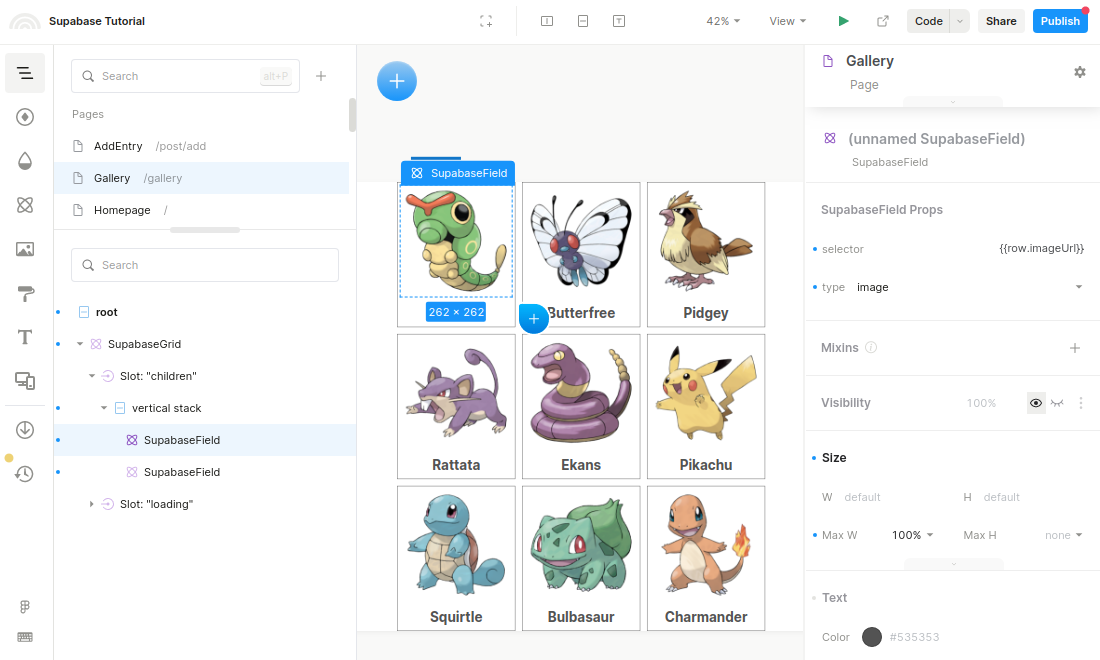
Now customize the repeated content by inserting instances of SupabaseField. Select the type of content and a selector string to fetch a single value. In the example below, we use {{row.imageUrl}} to retrieve the imageUrl column of the row. Apply any styling and layout you want on these elements.
Putting it all together (video)
For your convenience, the following video shows you how to create the page end-to-end.
Step 6: Check your dev server
If you have been running your development server this whole time, you’ll see that we have been automatically fetching and rebuilding your site as you make changes in Plasmic Studio. If you need to restart your dev server, just run:
_10yarn dev
See the results at http://localhost:3000/gallery.
How does this all work under the hood?
SupabaseGrid
SupabaseGrid is a code component that was registered in plasmic-init.ts. The props field is used to tell the Plasmic Studio the component prop interface, which allows us to expose these props in the right pane as shown in the screenshots earlier. See the docs for details on component registration.
_39// plasmic-init.ts_39..._39_39PLASMIC.registerComponent(SupabaseGrid, {_39 name: "SupabaseGrid",_39 props: {_39 tableName: "string",_39 tableColumns: "string",_39 queryFilters: "object",_39 children: {_39 type: "slot",_39 defaultValue: {_39 type: "text",_39 value: "Placeholder",_39 },_39 },_39 numColumns: {_39 type: "number",_39 defaultValue: 4,_39 },_39 columnGap: {_39 type: "number",_39 defaultValue: 16,_39 },_39 rowGap: {_39 type: "number",_39 defaultValue: 16,_39 },_39 count: "number",_39 loading: {_39 type: "slot",_39 defaultValue: {_39 type: "text",_39 value: "Loading...",_39 },_39 },_39 },_39 importPath: "./components/CodeComponents/DisplayCollections",_39});
SupabaseQuery
SupabaseGrid wraps a SupabaseQuery component, where we perform the query based on the provided props and store the result in a SupabaseQueryContext. This will be used in downstream components to display the data.
_30// supabase-demo/components/CodeComponents/DatabaseComponents.tsx_30export function SupabaseQuery(props: SupabaseQueryProps) {_30 // These props are set in the Plasmic Studio_30 const { children, tableName, columns, className, filters, single } = props;_30 const [result, setResult] = React.useState<any[] | undefined>(undefined);_30_30..._30_30 // Performs the Supabase query_30 let query = supabase.from(tableName!).select(columns + ",id");_30 query = applyFilter(query, validFilters, contexts);_30 const { data, error, status } = await (single ? query.single() : query.order('id', { ascending: false }));_30_30 if (error && status !== 406) {_30 throw error;_30 } else if (data) {_30 setResult(data);_30 }_30_30..._30_30 // Save the result in a `SupabaseQueryContext for use with downstream components_30 return (_30 <div className={className}>_30 <SupabaseQueryContext.Provider value={result}>_30 {children}_30 </SupabaseQueryContext.Provider>_30 </div>_30 );_30}
Note that this code component is defined in your codebase. Feel free to augment it to expose more powerful querying capabilities to the Plasmic Studio.
SupabaseGridCollection
SupabaseGrid also nests a SupabaseGridCollection under the SupabaseQuery. This code component is a simple CSS grid, where we retrieve the Supabase query results from SupabaseQueryContext, and iterate over the results. For each row, we populate a RowContext, which will be used by the children to read the results of a single row. Note the use of repeatedElement, a special convenience function that enables the component’s children to be repeated. In this case, this represents a single card to be shown in the gallery.
_29// supabase-demo/components/CodeComponents/DisplayCollections.tsx_29_29export function SupabaseGridCollection(props: SupabaseGridCollectionProps) {_29 const supabaseQuery = React.useContext(SupabaseQueryContext)_29 const { children, columns, columnGap, rowGap, count, className, loading, testLoading } = props_29_29 const result = supabaseQuery_29 if (!result || testLoading) {_29 return loading_29 }_29_29 return (_29 <div_29 style={{_29 display: 'grid',_29 gridTemplateColumns: `repeat(${columns}, 1fr)`,_29 columnGap: `${columnGap}px`,_29 rowGap: `${rowGap}px`,_29 }}_29 className={className}_29 >_29 {result.slice(0, count).map((row: any, i: any) => (_29 <RowContext.Provider value={row} key={row.id}>_29 <div key={row.id}>{repeatedElement(i === 0, children)}</div>_29 </RowContext.Provider>_29 ))}_29 </div>_29 )_29}
SupabaseField
SupabaseField will either render a SupabaseTextField or SupabaseImgField depending on the type. These code components simply read a single value from the contexts and display the data.
_10// supabase-demo/components/CodeComponents/DisplayCollections.tsx_10_10export function SupabaseTextField({ name, className }: { name?: string; className?: string }) {_10 const contexts = useAllContexts()_10 if (!name) {_10 return <p>You need to set the name prop</p>_10 }_10 return <div className={className}>{getPropValue(name, contexts)}</div>_10}
In summary, by populating state into React contexts, we can store and retrieve data for use in other code components, which can be used for arbitrarily powerful interactions in Plasmic Studio.
Details
Third-party integrations and docs are managed by Supabase partners.